How to boost your AdSense revenue

23 Agustus 2009

AdSense often easier than affiliate programs

Google's AdSense is a superb revenue generating opportunity for small, medium and large web sites.
Some webmasters are designing brand new sites specifically for serving AdSense text ads. (It's against the AdSense rules to design a site purely for AdSense, so you'll want to include a few affiliate links or sell your own product, too.)
Here's the background info:
AdSense overview
AdSense FAQ
AdSense tech FAQ

AdSense policies
AdSense allows you to serve text-based Google AdWords on your web site and receive a share of the pay-per-click payment. AdSense ads are similar to the AdWords ads you see on the right-hand side at Google when you do a search there.
AdSense is having a huge impact on the affiliate marketing industry. It's often much easier to generate revenue from AdSense than from an affiliate program.
Weak affiliate merchants will die faster than ever.
If you're a merchant running a lousy affiliate program, now's the time to improve it FAST.

AdSense's advantages
AdSense is simple to join.
It's easy to paste a bit of code into your pages.
It's free to join.
You don't have to spend time finding advertisers.
Google provides well written, highly relevant ads - chosen to closely match the content on your pages.
You don't have to waste time choosing different ads for different pages.
You don't have to mess around with different code for various affiliate programs.
You're free to concentrate on providing good content and Google does the work of finding the best ads for your pages from 100,000 AdWords advertisers.
It's suitable for beginners or marketing veterans.
AdSense provides simple, easy-to-understand stats.
If you have affiliate links on your site, you ARE allowed to add AdSense ads. However, with your affiliate links, you must not mimic the look and feel of the Google ads.
You can filter up to 200 URLs, so you can block ads for sites that don't meet your standards. You can also block strong competitors.
Inevitably, AdSense is competing strongly for space on web sites with all other revenue sharing opportunities.
If you own a small web site you can plug a bit of AdSense code into your site and almost instantly relevant text ads that are likely to appeal to your visitors will appear on your pages.
If you own several sites, you need apply only once. This makes AdSense much simpler than joining a bunch of affiliate programs.
As you can see, I'm really keen on this revenue sharing service.

Disadvantages
One problem is inappropriate ads. You don't want spammy junk advertised on your site. Google's standards probably aren't as high as yours. You can filter out 200 URLs, but in some industries that won't be enough.
The stats Google supplies are inadequate. They're easy to understand at a glance. However, they don't tell you exactly which ads people are clicking on, or which keywords are involved. That's frustrating.
Also, I'd like to be able to identify and block ads that have very low payout rates, without doing a lot of sleuthing and messing around.
The ad panels say "Ads by Google" - free advertising for Google. You don't earn anything if someone clicks on that link.
The minimum payout is $100, which is regarded as too high by sites which don't receive much traffic. That won't worry experienced webmasters.
Also, sites that want to display AdSense ads may not include "other content-targeted and/or text-based ads on the pages displaying AdWords ads." However, human beings review the sites. Rejected sites have been able to appeal successfully.
Another disadvantage is that Google doesn't allow you to share your stats with other webmasters. The AdSense Terms and Conditions say:
"Confidentiality. You agree not to disclose Google Confidential Information without Google's prior written consent. 'Google Confidential Information' includes without limitation: ... (b) click-through rates or other statistics relating to Site performance in the Program provided to you by Google..."
That's really weird. Web site owners need to be able to share such information and discuss successes and failures.
A big disadvantage of the service is that Google doesn't say how much its AdSense partners will receive. You'll just receive an unknown share of the revenue.
Only a company with the goodwill and respect Google has earned could get away with such a cheeky offer.
Google says:
"How much will I earn through this program? The AdWords ads you are able to display on your content pages are cost-per-click (CPC) ads. This means that advertisers pay only when users click on ads. You'll receive a portion of the amount paid for clicks on AdWords ads on your website. Although we don't disclose the exact revenue share, our goal is to enable publishers to make as much or more than they could with other advertising networks."
So the only way to know how much you'll earn is to try it and see. If you want to bail out, all you have to do is remove the code from your site.
Don't put all your eggs in the AdSense basket. If Google discovers fraudulent clicks on ads appearing on your pages, it can dump your site from the service, and refuse to pay you all revenue owed. Some webmasters who claim total innocence have had this happen to them.
Google has made several changes to its AdSense FAQ, clarifying varying things. For example, it IS possible to apply for separate accounts for separate web sites. I've done so, and checked with Google that it's OK in my case. Read the rules - they look ambiguous to me. If in doubt, ask first!
Some time after the launch of AdSense, Google added "channels" which improve the tracking. I strongly recommend that you experiment with these.
Sites with "excessive advertising" are being rejected.

How Do I Change the Width of my Blog?

22 Agustus 2009

Okay, get out your calculator. It's time for some math!

Right now, if you have the Minima template installed on your blog, the maximum width of your blog is probably set to 660 px (pixels) wide. If you were to break this down: 410 px have been given to the main body text of your blog, 220 px are set aside for your sidebar and the remaining 10 px are dividing the text of your blog entries from the sidebar (called "padding"). Playing around with these numbers will change the look of your blog.

One thing to note, however--there are still some people who have 800 x 600 resolution monitors. If you decide to change the dimensions of your blog to 1000 px (because this looks great on your monitor, which is 1280 x 800) then the content of your blog is going to run off the right side of their screen. That's not very professional looking...

Probably the widest you should go is 780 px. Just divvy this number up between your main body text and your sidebar: 550 px for the text, 220 px for the sidebar and 10 px for the gutter.

Where do you enter these magical numbers? Click on Edit HTML on the Page Elements page and follow these directions:

1) Scroll down to where you see the title Outer-Wrapper. You'll see that here is where the numbers are entered in!

2) Change 660 px to 780 px. Change the "main wrapper" from 410 px to 550 px. The sidebar wrapper and "padding" you can leave as is (220 px and 10 px).

Now, one more thing has to be done so that your pretty banner will be perfectly centered over your text:

3) Scroll up a little to the section entitled Header. Change the width from 660 px to 780 px. Now Blogger knows the right number with which to center your banner and everything will be lined up perfectly!

Customize Your Blogger Menu Links

Making money with our blogs includes some bigger topics like: Google AdSense, WidgetBucks, and URL submission to search engine giants: Google and Yahoo. However, there are a lot of little tweaks that we can easily make to our blogs, which will add to the reader's experience. And remember - no readers, no money - so make sure to take care of them!

We're going to do just that today by customizing our Blogger menu links. When you first create your Blogger blog you'll most likely get a menu that looks something like this:


That's a nice menu if your blog is more of a diary than an information site, but to make money we need to simplify things for our audience. We need to create navigation that is user friendly and easily understandable. For example - if I came to my site looking for information on Google AdSense, it would do me little good to see a long list of month and day links. However, if I saw a nice link that said: What is AdSense? THAT would be much more helpful.

So let's start by logging into our Blogger accounts and going to the Layout page. Once you're there, click on Add a Page Element. Instead of the Blog Archive module, we're going to add a Link List to our layout.


Here you will see a form that allows you to enter the title, number of links, sorting, page or site URL, and the name.


Let's quickly go over some of these options in a little more detail.

Title: This will be the name of your navigation menu. Your readers will see this so make it something useful. Let's say you're going to make a list of beginner tutorials, you might name this: Getting Started.

Number of links to show in list: This will allow you to control how many links are visible to the user. Unless you're going to have 100 links in your navigation, I would recommend keeping this blank. Keeping this field blank will show all of your links.

Sorting: You can choose to sort your list alphabetically if you wish. What I like to do is order them by topic. So for example: I would have a link: “What is Google AdSense?” before How to integrate “Google AdSense on Blogger?”

New Site URL: This is going to be the direct link to the site or page you want to display. You'll simply copy the URL string at the top of your browser for this.

New Site Name: And of course the name of your link. Try to be short and descriptive as possible. Ideally you want to fit the name all on one line and not have it break to another.

Now that you have a grasp of the options go ahead and add a link. Once you fill out the fields click the ADD Link button.


You'll see a little preview of your link's name and optionally you can edit, delete, or change the position with the arrows to the left (You'll need more than one link for the arrows to show).


When you're happy with your changes - save them and you're done! Not too bad for a days work (considering our day is only 10 minutes long).

In just minutes we got rid of the hard-to-navigate menu system that Blogger gives us out of the box, and replaced it with a more intuitive menu that our readers will appreciate. By doing this we've made the overall experience better, which will lead to: more repeat visitors, happy newcomers, and more money for us!

Using a Custom Header Image with Blogger

Today we're going to take a break from our money making talk to discuss an important issue I found with Blogger. Yesterday I attempted to use my spiffy new logo (shameless self-promotion coming up) for Earn Money to Blog.


Well long story short, there seems to be a known issue when uploading your header image for people using a custom domain. What does that mean exactly? Well, instead of something like: http://earnmoneytoblog.blogspot.com, I purchased a custom domain name: http://www.earnmoneytoblog.com. Anyway, today I'm going to show you a way to get around this annoying issue so you can use a custom image for your header too!

First things first - You're going to need a hosting service where you can upload your custom image. Here at Earn Money to Blog, we use free tools to get our work done. My suggestion for image hosting is Photobucket.


Head on over there and sign up for your free account and then upload your custom image.

Next, go to your Blogger account and into your layout (click the Template tab). Once you're at the layout screen, go ahead and click on Add a Page Element. Instead of clicking on the AdSense options like we have in the past - we're going to add an HTML/Javascript module to our layout.


Before you pass out like Marie Osmond did on Dancing with the Stars last night (my girlfriend makes me watch it - I swear!) And here's a YouTube link in case you missed it: Marie Osmond Passes Out on Dancing with the Stars.

Oh hi there! Welcome back... let's continue.

You don't have to know a lick of HTML to get this done, I promise. I'll tell you exactly what needs to be done!

Now open up a new tab (or window) in your browser. Go to the Photobucket site and login with your account if you aren't there already. Scroll down a little ways and you should see the image you uploaded. Here's what mine looks like:


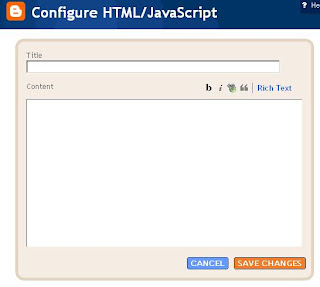
Go ahead and copy the text box that's labeled: HTML Tag. Once that's done, paste it into the Configure HTML/Javascript form on Blogger. Your form will look like this:


We're almost done. Stay strong here, because I'm going to have you edit some HTML. It's going to be dead simple - just watch.

Three quick tweaks that needs to be made to our HTML:

1.) The section that starts: “a href=http://blahblahblah” … remove everything starting with http all the way to the .com, and replace that with a link to your home page. This will allow users to easily navigate back home by clicking on your header.
2.) Remove the “target=”_blank” completely. This will prevent your page from popping up a new window.
3.) Change the “alt=”Photo Sharing blah blah” to something descriptive about your site. Mine is simply: Earn Money to Blog.

Save your changes, position your custom header image in the layout to the desired position… and you're done!!

Blogger is an awesome service, but it's not without it's flaws. But hey, it's going to help us earn money blogging so we'll deal with the hiccups along the way. Until next time - go earn yourself some money!

Creating a Custom Domain for Your Blogger Blog

There are a lot of factors involved that will help us monetize our blogs. If you registered with the free Blogger service (check this out if you don't know how), creating a custom domain name is a snap. And doing so will help you in the long run with: branding and ease of use. We don't want our readers to type in: http:///mycoolblog.blogspot.com - we'd rather a cleaner url like: http://www.mycoolblog.com. This article will show you how.

First off - you're going to need a domain name. Here at Earn Money to Blog, I like to preach about our free tools. But I have some bad news for you - this is going to cost you - and big… $9.99/yr (can you sense my sarcasm?) Definitely not a requirement for earning money with our blogs but a small investment that's well worth it.

Head on over to Go Daddy and sign up for an account.

For this article, let's just assume you created the domain name: superapplepies.com. You just can't wait to take the shinny wrapping paper off your new domain name and apply it to your Blogger blog! Let's go log into our Blogger accounts and at the dashboard, click on Settings. You'll see the familiar tabs and menu options - We're interested in the Publishing link.


Your picture may differ than mine, but here is what my Publishing page looks like:


If it looks a bit different, try poking around for an “Advanced” link. That should do the trick.

Notice to the right there is a “Need a domain?” option from Blogger. Google has actually “tried” to make life easier for you by allowing you to purchase one right here (they actually partnered with the Go Daddy service that this very article talks about!). This may not be a bad idea (if you didn't already sign up at Go Daddy yourself), however, I had mixed results with this in the past. And besides, signing up at Go Daddy ourselves will give us more flexibility.

Before you go typing your new domain name in there… WAIT! We need to make some quick configurations over at our Go Daddy account to point the name to the Blogger service first.

Log into your Go Daddy account if you aren't already, and click on the My Domain Names option.


You should see your new domain listed there. In this example you would see superapplepies listed. Simply click on the link to drill down into your domain options (note: If you don't see your domain name right away, don't panic. Sometimes this process can take a few minutes).
You're now at the Domain Control Center. It all seems pretty overwhelming for some of us, but I'm going to point out the option you need to select called - Total DNS:


Again, if you don't see that option there - relax… go talk to your loved ones for a little while, they miss you.

Back Already?

Now you're sitting at the Total DNS Control Panel. Here we're going to make one simple change - we need to edit the “www” in the “Host” column, in the “CNAMES” table.


Change your “Points To” value to match the picture above: ghs.google.com, by hitting the edit button.


Save your changes and switch back over to your Blogger account. We left off on the Publishing screen and now we're going to wrap up the process. Under the Advanced Settings, in the Your Domain section, enter your new domain name.


Save your settings and you're done! Now the only downside (what? I have to give it to you straight) is that your domain name changes won't happen automatically. In some cases it can take up to 48 hours, but my experience has been less than a couple (yours may vary).

Congratulations - you now own a piece of the pie (pun intended) with your custom domain name. Well, we did have our space before but now it's more personal. And earning money with our blogs is all about our personal touch on the World Wide Web.

Track Your Site Visitors in Real Time for Free!

We love blogging for money and it's more exciting than Red Sox, Rockies Game one World Series! But when we set out to make money with our blogs we need tools to track our sites progress. Today I'd like to introduce an excellent free tool (there are subscription options as well) that will allow us to track our visitors in real time! That's exciting.

The blog tracker is called HitTail.


What HitTails does, is record the keywords that your visitors used to find your site. Let me refer you to a great article over at Tech Crunch with the details.

Signing up for the free service is easy - just head on over to the HitTail registration page and fill out the form.


Once you've successfully completed the registration process, you'll have to copy and paste a piece of JavaScript into your HTML. Don't panic! I'll help you.

Log into your Blogger account and head over to the Layout page. From here you're going to click on the Edit HTML option in the menu.


This page shows you the HTML and JavaScript that makes your blog chug along on the Internet. In order to track our sites statistics, (so we can maximize the amount of money we will make some day soon.) we'll need to paste that piece of JavaScript into our text window.


Scroll all the way to the bottom of your HTML screen and look for the "body" tag.


Now simply paste the code you got from HitTail and place it on the line directly above that tag and save your template changes.

You can head back to HitTail, log in with your credentials, and start tracking your blog statistics in real time like it's Apple Stock on Wall Street! As Austin Powers would say: “Yeah baby, yeah!”

Submit Your Blog to Google and Yahoo Search Engines

Like the 2007 Boston Red Sox - Google and Yahoo are champions. Together they help power millions of queries on the Internet every day.


In Promoting Your Blog with StumbleUpon we learned that blog promotion is an important factor to making money blogging. In order to generate revenue from our sites we need traffic and StumbleUpon is a great source. However, even before you start to network with sites like StumbleUpon, you'll need to submit your URL to Google and Yahoo search engines.

What's that? You don't have a blog yet? Sheesh… head over to Creating a Blog Site for FREE and come back when you're done!

Google URL Submission

Head over to Add your URL to Google and simply enter your URL, some comments about your site, and the letter verification.


When you're set, just press the Add URL button and Google will do the rest!

Yahoo URL Submission

Now that you have submitted your blog to Google, let's do the same with Yahoo. Go to Yahoo Site Explorer


Here you can submit both your sites URL and feed. When you have the information placed in one of the text boxes just submit and you're done!
Google and Yahoo claim their search bots may not crawl your content for months but from my experience it takes a matter of days. As long as you constantly crank out quality content you will be in business.

Pretty simple eh? In just a few minutes we easily submitted our blogs to the major search engines. This will go a long way in promoting and driving traffic to our blogs. Our money-making days are just around the corner now.

How do I put WidgetBucks on my Blog?

In What is WidgetBucks? We learned that there are more ways than just Google AdSense to make money from blogging. If you know about WidgetBucks and want to sign up go ahead and do that now:


Earn $$ with WidgetBucks!


WidgetBucks allows us to easily integrate product ads on our Blogger blog but how? Luckily for us, WidgetBucks and Blogger make it a very straightforward process. Let's start by logging into our WidgetBucks accounts and click on the New Widget button in the menu.


This will bring us to the Customize Your Widget page.


From here you simply create a name for your widget, point it to the page you're going to place it, customize the design, and finally select what type of product you want served. Once you're set just press the Get code button and copy the HTML/JavaScript. Don't worry - like everything else we do around here - you don't need to know anything about HTML or JavaScript to start making money. But you do have to know how to copy and paste!

Now that you have your widget code, log into your Blogger account. At the dashboard go to Layout and then Add a Page Element. If for some reason you've been hiding under a rock this whole time and don't have a Blogger account - check out Create a blog.

You should have the Blogger form with all your layout options now. Here you're going to click on the HTML/JavaScript option.


Go ahead and paste your widget code in the main form - you can optionally give it a title if you want - I don't. Once you save your changes you're done! Congratulations! You're ready to start making money with WidgetBucks.

John Chow’s FREE - Make Money Online Ebook

We love to make money with our blogs, and we especially like to do it with FREE tools and information. Google AdSense, WidgetBucks, Blogger – all free! And the other day I came across yet another free resource for us; this time in the form of an Ebook by John Chow called: Make Money Online.

Who is John Chow and why should I care?

John Chow is a Dot Com Mogul – a status we’re all vying for. His documented success online has led thousands of little Chow-a-maniacs to flock to his site daily (yours truly included)


I’ll have to admit – my first impression wasn’t so hot. You go to his site and instantly you’re met with images of hundred-dollar bills, hot fancy cars, and a tagline that says: “I Make Money Online by Telling People How Much Money I Make Online”. Just a little bit on the arrogant side, don’t cha think?


(Sticking with the wrestling theme here)

Once you go beyond the subliminal messages and peel away the initial wrapping, you learn that he’s not just another “Get-rich-quick-scheme” guy. No, he’s much more – and his FREE ebook – Make Money Online is just one reason why.

Make Money Online is a very practical guide that is packed with over 50 pages of expert advice. It’s easy to read and by the 2nd chapter he gains your trust and commands your attention.

Here’s a run down of the nine chapters that are available:

  • Introduction
  • My Recommended Money-makers
  • Beginner’s Blogging Tips
  • Must Have Wordpress Stuff
  • Pumping Out the Content
  • Monetize Your Blog
  • Google Optimization
  • Promotion Ideas
  • My Story


Reading this FREE book is a must. It’s an eye opener for beginners and a great reference for veterans. I even found myself tweaking some things here and there on my own site!

To get the FREE book you just have to subscribe to his newsletter (near the top of the page). It takes just a few seconds and it’s valuable information that’s well worth your time. Head over there now – you’ll thank me later.

Google AdSense for Search on Blogger

Earning money with Blogger is more fun than watching a Britney Spears meltdown (no really it is!). And today is no different as we learn how easy it is to add AdSense for Search on our Blogger blogs.

We learned in AdSense Options for Blogger: Part 1 and AdSense Options for Blogger: Part 2 that the Blogger service gives us some nice Google AdSense abilities right out of the box. In just minutes we can easily get up and running with ad and link units. But there's more to AdSense - a lot more.

Let's go to our Google AdSense accounts and login. Once you're there, click on the AdSense Setup tab.


We're presented with several Google AdSense options. You'll notice that the first choice (minus the images option - we'll talk about that in another article) is what we have on our Blogger blogs now: AdSense for Content. But today we're focused on AdSense for Search, so go ahead and click on that now.


AdSense for Search is a great option for our blogs. It gives our readers the ability to search the Internet from our site, as well as our content.

Ok, we're at the AdSense for Search screen now. Feel free to play around with the configuration options to best match your site. This is a judgment call on your part and should be tweaked, as you feel necessary. When you're done, click next and keep the defaults for now on the following page (you can always come back and play around) and hit next again. You should see the search box code that has your html ready for you to copy and paste!


The fine folks at Google do all the hard work for us - no messy HTML for us to write! Once you've copied the entire contents of the text box, log into your Blogger account and navigate to the Layout of your site. From here, choose the Add a Page Element and select the HTML/Javscript option.


Go ahead and paste the HTML that you copied from the Google AdSense page into your HTML/JavaScript form and save your changes.


That's all there is to it! In just a few minutes you were able to easily add Google's AdSense for Search onto your Blogger blog. That wasn't so painful now was it?

Now scram! It's time for you to earn some money!

Five Ways to Drive Traffic to your Blog

When you blog for money you need to create your own content (and lots of it!), implement advertisement programs like Google AdSense and WidgetBucks, and last but not least – you need traffic.


In our offline lives we dread it, but online we embrace it. I want to give you 5 ways to start driving traffic to your blog today. With a little time and patience, you will slowly start to increase your viewer ship.

(In no particular order)

5.) Post comments on other blogs.

Blogs are everywhere – there’s certainly not a shortage of them. You should have no problem finding other bloggers in your niche that are popular and interesting. Bookmark those that you like, follow their topics daily, and if you find something that sparks your interest – comment.

Become a participating voice in the community. The more interesting your comments are, the more likely your peers will follow you to your blog. And who knows – you might stand out among the crowd and be recognized by the author, which can spin off into better opportunities.

4.) Register with blog networks like: Technorati, BlogCatalog, and MyBlogLog

It’s important that you get your blog out there for others to see. You can start the process by submitting to search engines, but that’s just the beginning. Technorati, BlogCatalog, and MyBlogLog are just a few of the high profile blog networks on the web. Register with them, network with other people in your releated area, and get your word out.

When you register with these services remember a couple of things:

1.) Create a detailed profile. Let people know a little bit about you and draw them in. Without that personal interaction people may flee quickly.

2.) Tag your blog properly. Tags are very important – they’re usually one or two word descriptions of your blog. So for example my blog would fall under categories like: Money, Business, and Finance. Dig around the specific service and look for popular tags and try to use those for your blog. It allows people who are interested in these topics to easily find your site.


3.) Register with several forums.

Do a Google search for forums that are related to your niche and register. Try to be an active voice in the community. People will flock to you if you’re interesting. Not only that but it allows you to find out what others are doing and what makes them appealing.

When you register with a forum, make sure to fill out the profile, similar to the blogging services. And equally as important – make a signature that is a direct link to your blog. Your signature is shown in every post that you make – helping you gain visibility. This is all the more reason to create thought provoking discussions.


2.) Social Bookmarking and Article Submission.

Social networking, bookmarking, and article submissions are all the rage today – don’t let it pass you by. Some of the major networks include delicious, Furl, and of course, Digg. These sites will allow you to tag, bookmark, and submit articles that you think are interesting. What’s more interesting than your own work? People should know about it so go spread the word.


1.) StumbleUpon

StumbleUpon really falls into tip #2, but I decided to break it away from the pack because it provides quicker results. Like the rest of the social networking sites, you create a profile and network with others. But what makes StumbleUpon so darn unique, is that you can “stumble” thousands of sites that you’re interested in by the click of a button. So what does that mean for you? Well, you can stumble your own site. By doing this you get into the Stumble rotation, and any people that you network with can stumble across it as well.

In my experience StumbleUpon can bring great surges of traffic for short periods of time. Due to the nature of the service, you’re likely to get overlooked more than not; however, those that do stop – tend to stay. And if they like the site, they can rate it and review it for all the friends in their network to see. Are you getting the picture here? Your viewer ship has the potential to explode!

As with most things in life, there’s no silver bullet for getting traffic. It takes a lot of research, careful planning, networking, patience, and time. If you have what it takes and start using my recommendations, you will definitely start to see an increase. Hopefully that increase in traffic will help you blog for money.

Making Money Blogging in 10 Steps (By ebiz)

Firstly, we all want to know How to Make Money Online, and one of the best ways I have found is by creating blogs. In this article I intend to show you how you too can learn How to Make Money Blogging by telling you how combining the techniques I have gathered from across the web helps to make me $$$ every day. Secondly, I am not trying to sell you my latest “Get Rich Quick” scheme because I don’t have one. Each eBook you read will have a wealth of information within them which will, without a doubt help you to discover the secrets of How to Make Money Online. I am only going to tell you which ones out of the 100’s available you SHOULD read if you too want to make lots of money.
I use a 10 step guide to setting up and starting all of my blogs.
I will give you a list of the top 10 resources later that I use and recommend to everyone who is serious about making lots of money online. One of the vital aspects people seem to miss out when they first get into blogging is the fact that their blog must contain information that people want to read.
Many bloggers are looking through closed eyes in this regard and if you browse through 50 blogs you will notice that most will tell you they know How to Make Money with Blogs when really all they tell you is where they went on their vacation or how many cars they have.
Are you ready to learn How to Make Money Blogging?
If the answer is YES then read on and start to make money with your blog. I am not here to tell you how to write your blog, that’s up to you, but what I am about to tell you is the 10 things I use to make money on the internet. You can choose to use these techniques or not, that’s your prerogative.
Step 1 – Finding a Topic
Turn off your computer, grab a pen and some paper and sit somewhere you can relax but also stay focused (if you are just starting out this step can be a pain because we all want to know How to Make Money Online and we want to know how to make it NOW). Think of a topic you are interested in and write it down (this helps because you will be more committed to trying instead of giving up in a day or two) and also make sure it is something other people are interested in too. A couple of ways I use to think of a topic is by using MetaSpy to find out what people are searching for, Ask IQ to find what’s popular and VRE Toolbar to find out how many people search for the topic (this is also useful later on to get traffic). Write down your top five keywords, you will want to use them later in your blog.
Step 2 – Create Your Blog
Find and create your blog online. I like to use Blogger but other popular Blog platforms are Wordpress and Movable Type. You can find all the help in the program you use to get information when setting up the blog. Create your content, make it original, and make it informative. This is one of the main keys to learn How to Make Money with Blogs. You need to include the keywords you wrote down in Step 1 in the content of your blog. Try not to overuse these as it sends out bad signals to the search engines, and this is 100% not what you want.
Step 3 – Go Google
Sign up for Google Adsense and insert the code in the margin of your blog. You can customize your ads in many ways, such as including text links or image links. I prefer the text links only, as they are easier to blend in with your blog and don’t take the focus away from the information. Google Adsense will probably not make you a millionaire but it is an instant way of generating a small amount of money.
If you want to track where your visitors are coming from with regards to direct hits or from search engine results then I would suggest you use Google Analytics and again you can get all the help you need setting that up from within the program.
You will also want to add your URL to Google’s index.

Knew More Single Lens Reflex (2)

08 Agustus 2009

In this time, I want to share about optical components in SLR camera.

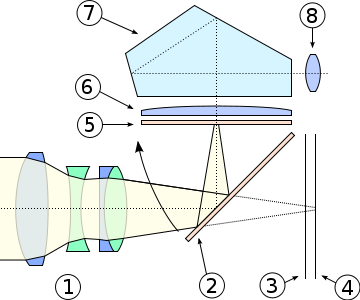
A cross-section (or 'side-view') of the optical components of a typical SLR camera shows how the light passes through the lens assembly (1), is reflected by the mirror (2) and is projected on the matte focusing screen (5). Via a condensing lens (6) and internal reflections in the roof pentaprism (7) the image appears in the eyepiece (8). When an image is taken, the mirror moves upwards from its critical 45 degree angle in the direction of the arrow, the focal plane shutter (3) opens, and the image is projected onto the film or sensor (4) in exactly the same manner as on the focusing screen.

This feature distinguishes SLRs from other cameras as the photographer sees the image composed exactly as it will be captured on the film or sensor.

Pentaprisms and penta-mirrors

Most SLRs use a roof pentaprism or penta-mirror to direct the light to the eyepiece, but there are other finder viewing capabilities, such as the waist-level finder, the interchangeable sports finders used on the Canon F1, F1n and F1; the Nikon F, F2, F3, F4 and F5; and the Pentax LX.

Another prism design was the porro prism system used in the Olympus Pen F, the Pen FT, the Pen FV half-frame 35 mm SLR cameras. This was later utilized on the Olympus EVOLT E-3x0 series, the Leica Digilux 3 and the Panasonic DMC-L1.

Lastly, a photographer can also purchase a right-angle finder which slips onto the eyepiece of most SLR's and D-SLR's and allows viewing sans a waist-level finder. There is also a finder which provides EVF remote capability.

Knew More Single Lens Reflex (1)

The single-lens reflex (SLR) camera uses an semi-automatic moving mirror system which permits the photographer to sometimes see exactly what will be captured by the film or digital imaging system, as opposed to pre-SLR cameras where the view through the viewfinder could be significantly different from what was captured on film.

Prior to the development of SLR, all cameras with viewfinders had two optical light paths: one path through the lens to the film, and another path positioned above (TLR or twin-lens reflex) or to the side (rangefinder). Because the viewfinder and the film lens cannot share the same optical path, the viewing lens is aimed to intersect with the film lens at a fixed point somewhere in front of the camera. This is not problematic for pictures taken at a middle or longer distance but parallax causes framing errors in close-up shots. Moreover, focusing the lens of a non-reflex camera when it is opened to wider apertures (such as in low light or while using low-speed film) is not easy.

Most SLR cameras permit upright and laterally correct viewing through use of a pentaprism situated in the optical path between the reflex mirror and viewfinder. Light is reflected by a movable mirror upwards into the pentaprism where it is reflected several times until it aligns with the viewfinder. When the shutter is released, the mirror moves out of the light path and the light shines directly onto the film, or in the case of a DSLR, the CCD or CMOS imaging sensor.

Focus can be adjusted manually by the photographer or automatically by an autofocus system. The viewfinder can include a matte focusing screen located just above the mirror system to diffuse the light. This system permits accurate viewing, composing and focusing, especially useful with interchangeable lenses.

Up until the 1990s, SLR was the most advanced photographic preview system available. But the recent development and refinement of digital imaging technology with an on-camera live LCD preview screen has overshadowed SLR's popularity. Nearly all inexpensive compact digital cameras now include an LCD preview screen allowing the photographer to see exactly what the CCD is capturing. However, SLR is still popular in high-end and professional cameras, because the pixel resolution, contrast ratio, refresh rate, and color gamut of an LCD preview screen cannot compete with the clarity and shadow detail of a direct-viewed optical SLR viewfinder.

Blog Sahabatku

01 Agustus 2009


Di halaman ini khusus ku persembahkan buat meng'iklan'kan blog sahabatku Asmari. Soalnya dagangannya pada ga' laku. Sohibku yang tampan tapi gila ini dagang sepatu, ikan, sayur, biskuit, dan yang paling penting (dengan mata bersinar-sinar) dia jual sate asli dari Madura..Huahaha.. Engga'..engga', semua itu ga bener, just kidding fren.

Blog doi berisi nasi, sayur, lauk ma sambal. Wah, tu kan makan siang gue. haha.. Becanda sob, blog doi isinya seputar catatan hariannya, informasi dan pengetahuan sekitar dunia internet, gaya hidupnya dibawah jembatan, aktivitas kampusnya. Wah banyak deh, ga' bisa dijelasin kriminal yang satu nie. :D

Buat temen-temen yang tertarik pengen mengunjungi blognya bisa langsung ke TKP (Tempat Keingintahuan Pembaca) di http://asmarie.blogdetik.com


Copyright © Arif's Blog
Desain dengan Protonema | Numpangnya di Blogger